[ad_1]
Do you have several PCs at home, all connected to the same network? Let’s say you want to access one that’s currently switched off, but don’t want the hassle of heading for it just to switch it on.
Setting up Wake-on-LAN is perfect for that scenario — with this technology, you can instantly power up another computer from the comfort of your chair. If this sounds of interest to you, then read on to learn how you can set up your Windows PC to use Wake-on-LAN, with our handy step-by-step guide.
What is Wake-on-LAN?
IBM and Intel collaborated on a project back in the mid-1990s to improve the way that computers on networks could be remotely managed. One outcome of their combined efforts was an Ethernet standard called Wake-on-LAN (WoL).
When a computer is in a low-power state, it can be powered back up if the Ethernet adapter receives a “magic packet.” This is a tiny block of data, broadcast across the whole network, that contains a ‘wake up’ instruction for a specific machine.
For a computer to react to this command, its network adapter and installed operating system must support WoL. Windows 7 doesn’t support it officially and if you have fast startup enabled in Windows 8 and 10, that can potentially cause problems, too. Fortunately, the makers of Ethernet and Wi-Fi adapters have worked around these issues, and ensure that most of their products retain enough power to accept a WoL command in Windows, macOS, and plenty of Linux distributions.

So if you have several machines on your network but don’t use them all the time, you can keep them asleep or hibernating and use Wake-on-LAN to remotely power them up when required.
And although WoL can’t switch them off once you’ve finished with the machine, most OS let you set a timer to put them back into Sleep mode after a period of inactivity.

This guide was built around Windows PCs connected to the same network, via Ethernet or Wi-Fi. It is possible to wake computers from another network, using Wake-on-WAN, but that’s a bit more complicated — we’ll look at that later in the guide.
Step 1: Enable it in the BIOS
To switch on/wake up any PC that’s on your network, the first thing you need to do is activate the Wake-on-LAN option in the motherboard BIOS, assuming you’re using onboard Ethernet or Wi-Fi adapter.
Switch on or restart the computer you want to remotely enable, and enter the BIOS by pressing the Delete or F2 key (press it lots of times!). The exact location of the setting will depend on the brand and model of the motherboard used — below are screenshots from an Asus Z390-Plus Gaming.
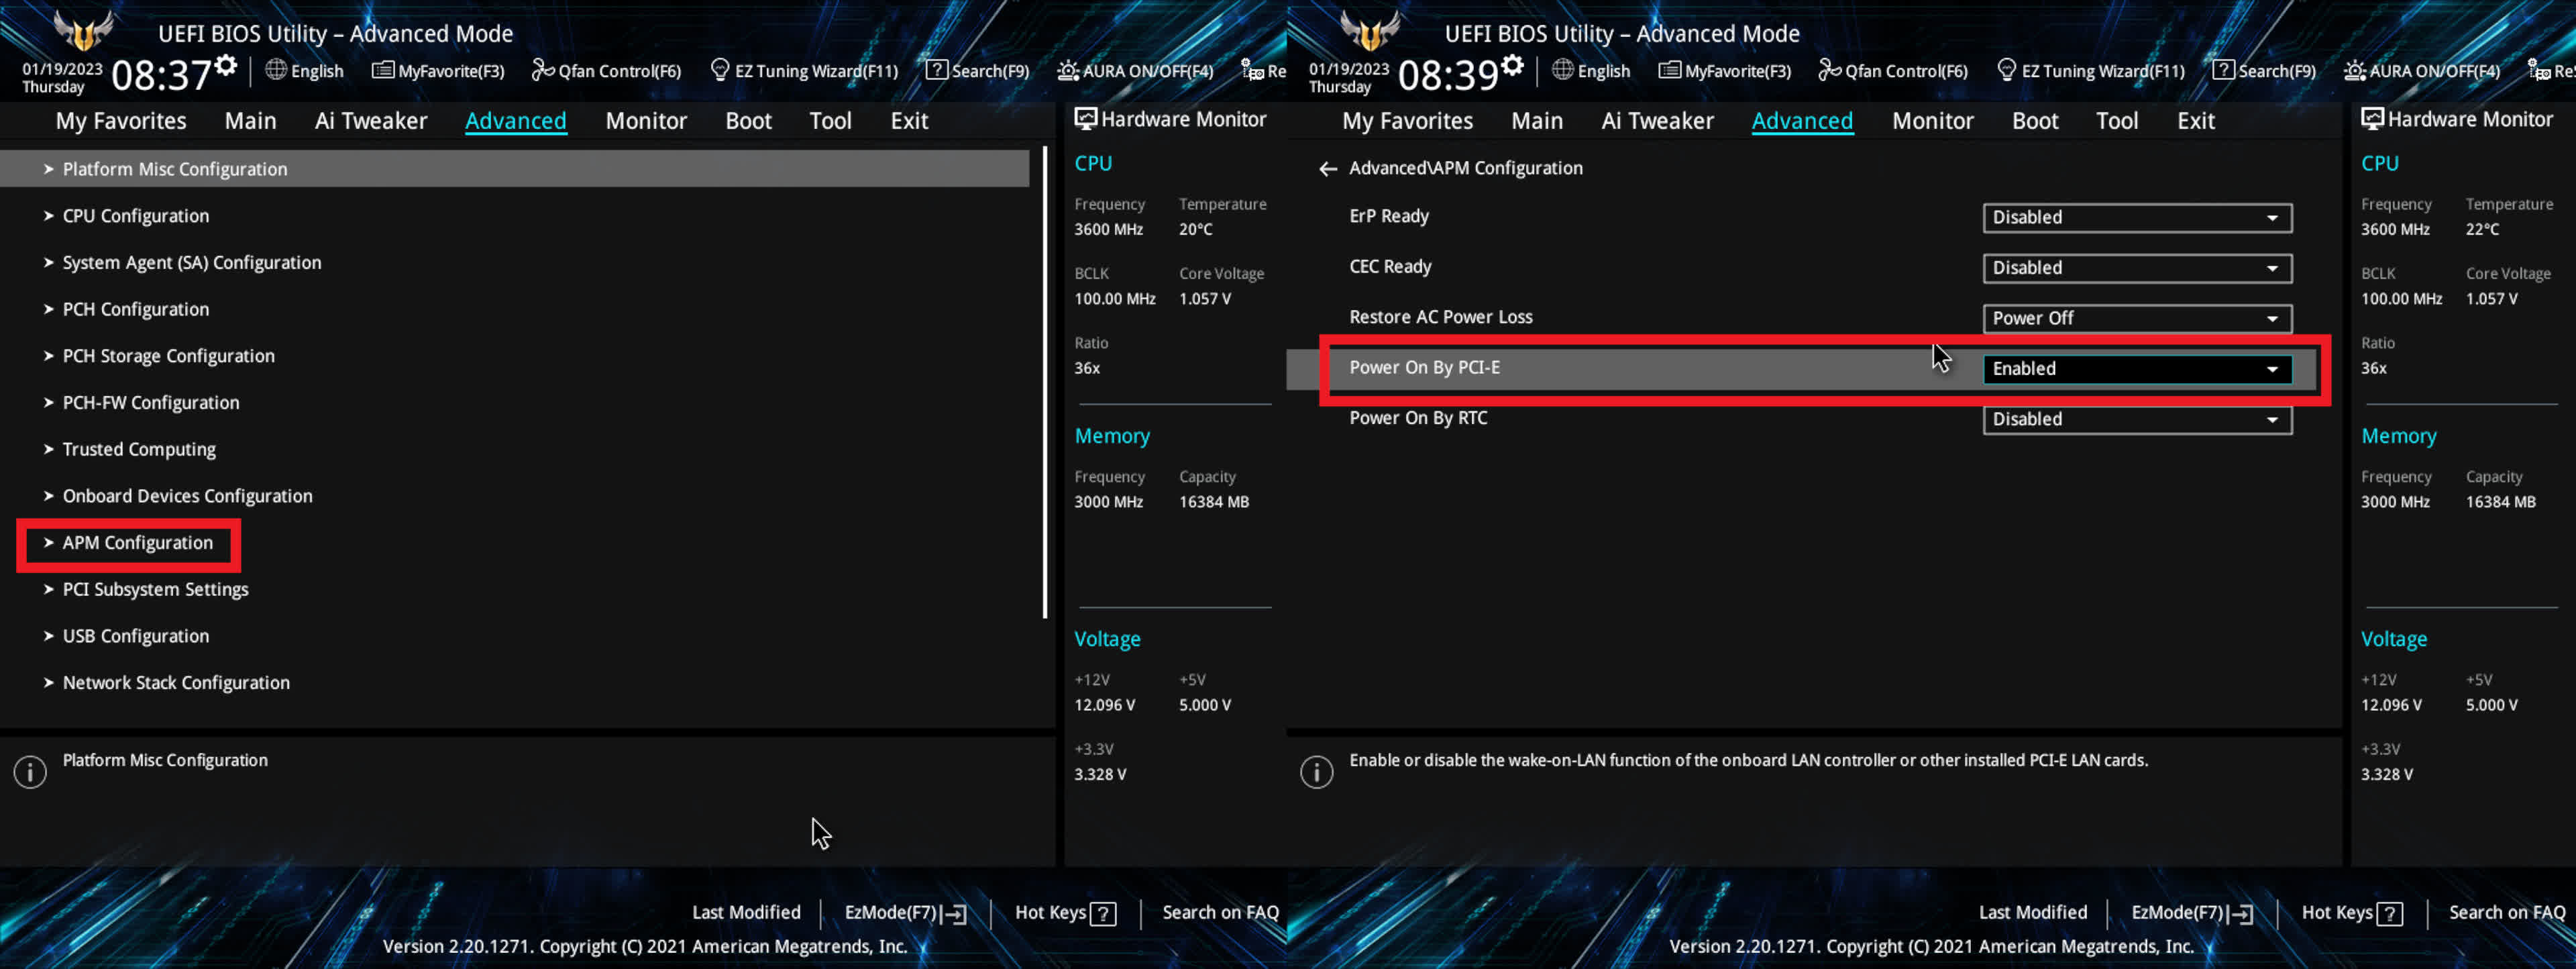
For this particular product, we go to Advanced Mode, then Advanced, and finally the APM Configuration section. Here, enabling the “Power On By PCI-E” option lets the Ethernet controller turn on the PC when it receives the right command over the network.
Unfortunately, not all computers have a BIOS with comprehensive options like this — cheap pre-builds for office work or basic laptops often provide the bare minimum of things you can change. If you’re not sure, check the manufacturer’s website and look for WoL support in the specifications.
Step 2: Enable it in the OS
With the motherboard now configured, you have to do the same in Windows.
Press the Windows key + X or right-click the Start menu icon — select Device Manager from the list.
Head to the Network adapters section and right-click on the Ethernet one (ignore any that says WAN in the name). Select Properties and then Power Management — check all of the options you can see here.
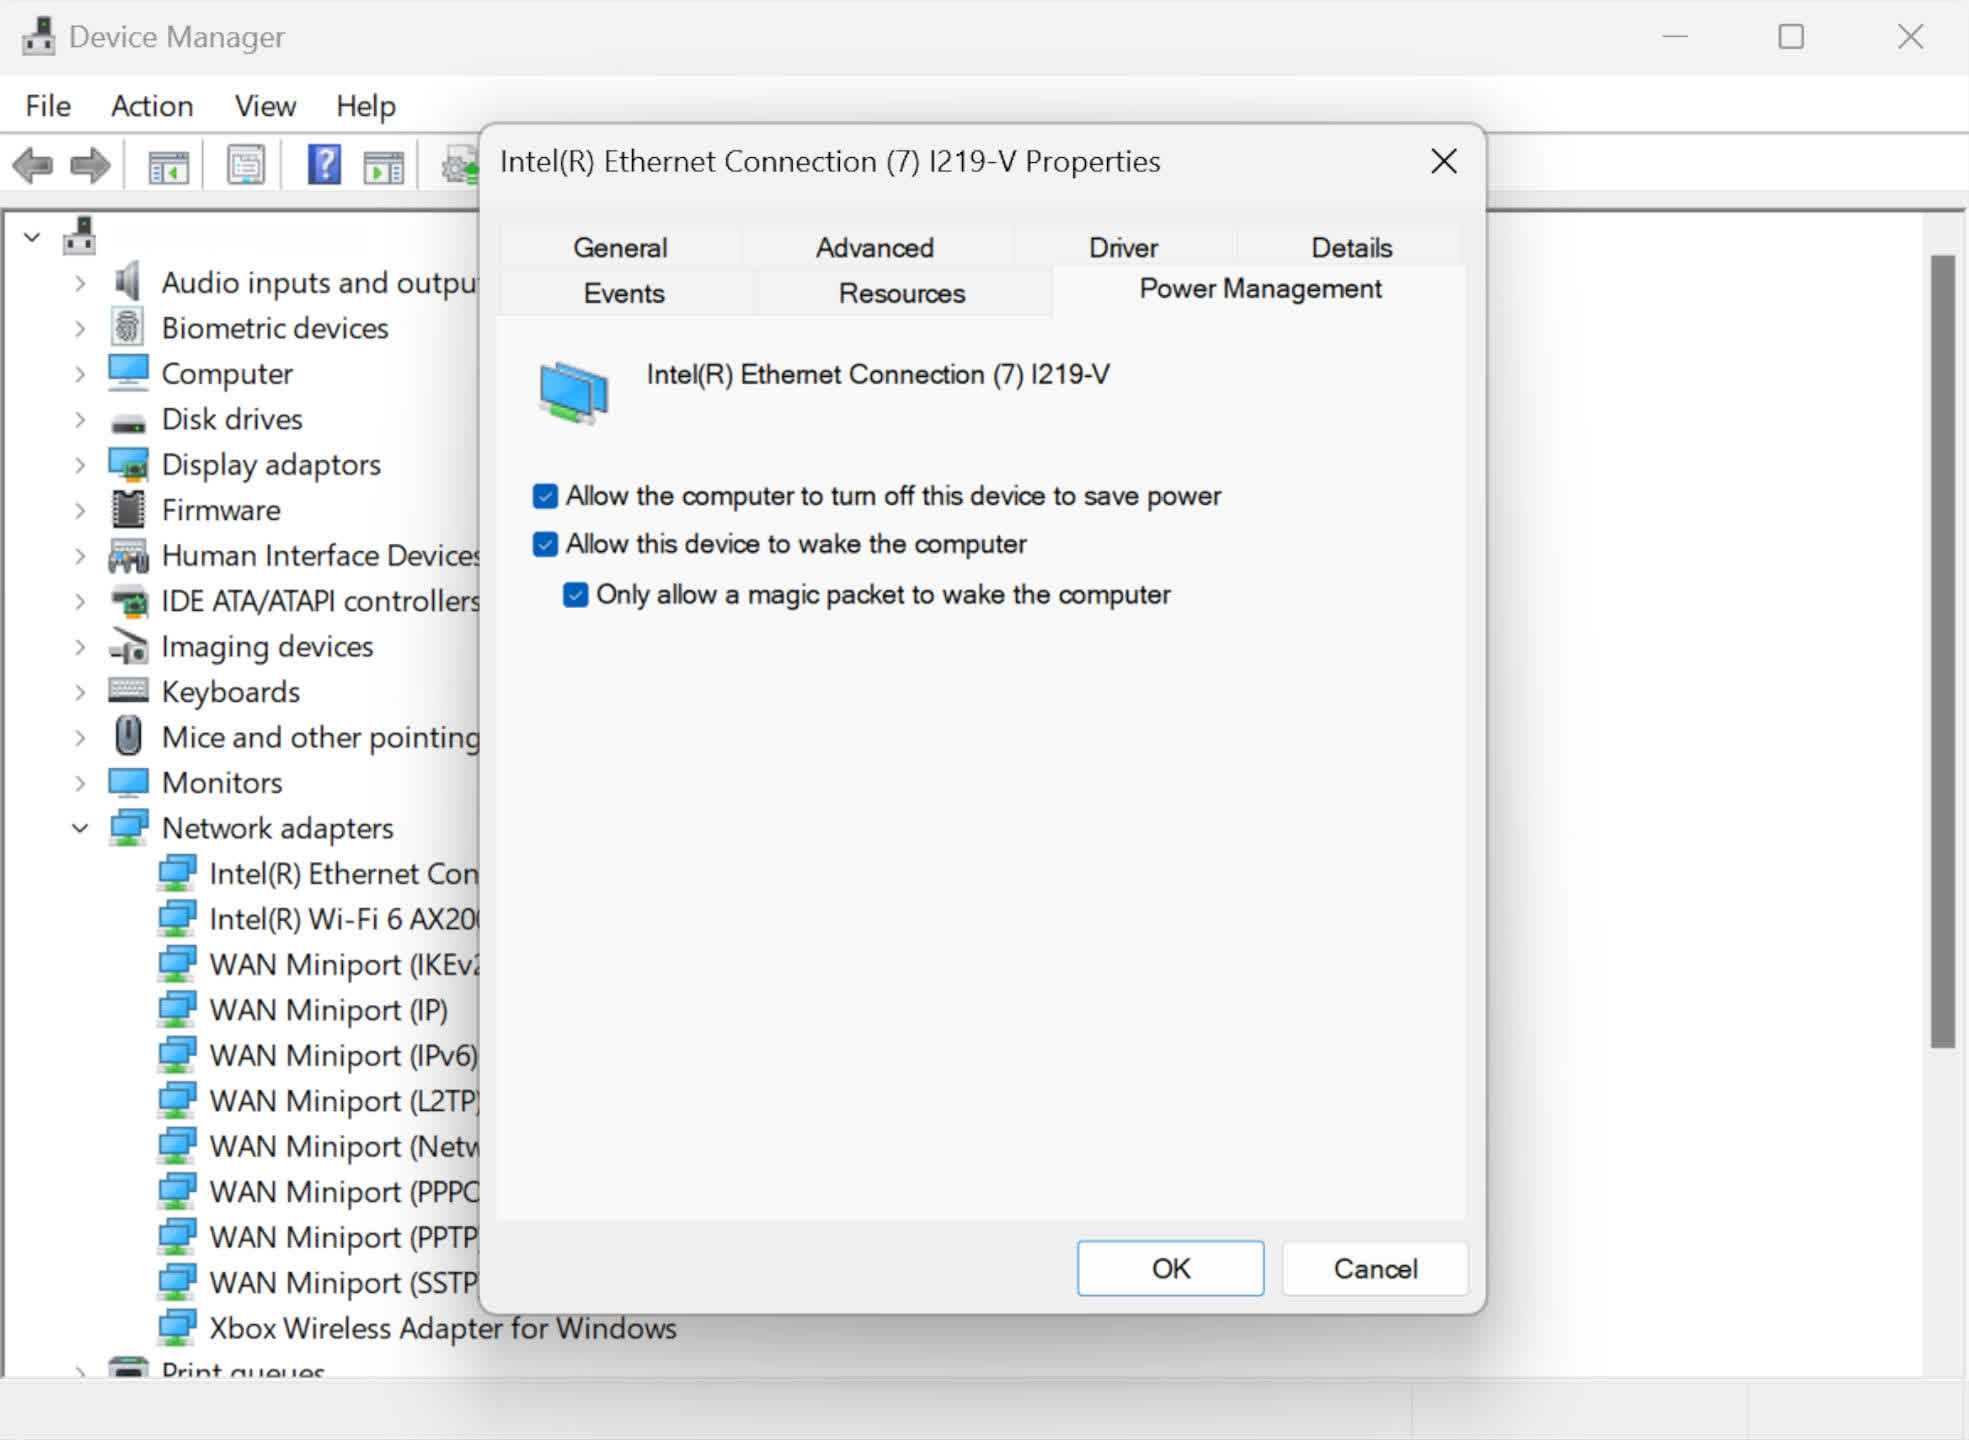
If the PC is connected through Wi-Fi, then do the same as above but for the wireless adapter — however, where almost every Ethernet adapter supports WOL, not all wireless adapters offer Wake-on-Wireless-Lan support.
You might also need to enable the Wake on Magic Packet option in the Advanced tab. Not all network adapters will show this setting and it’s probably the case that Ethernet adapters automatically support it, whereas Wi-Fi adapters need to be actively told to do so.
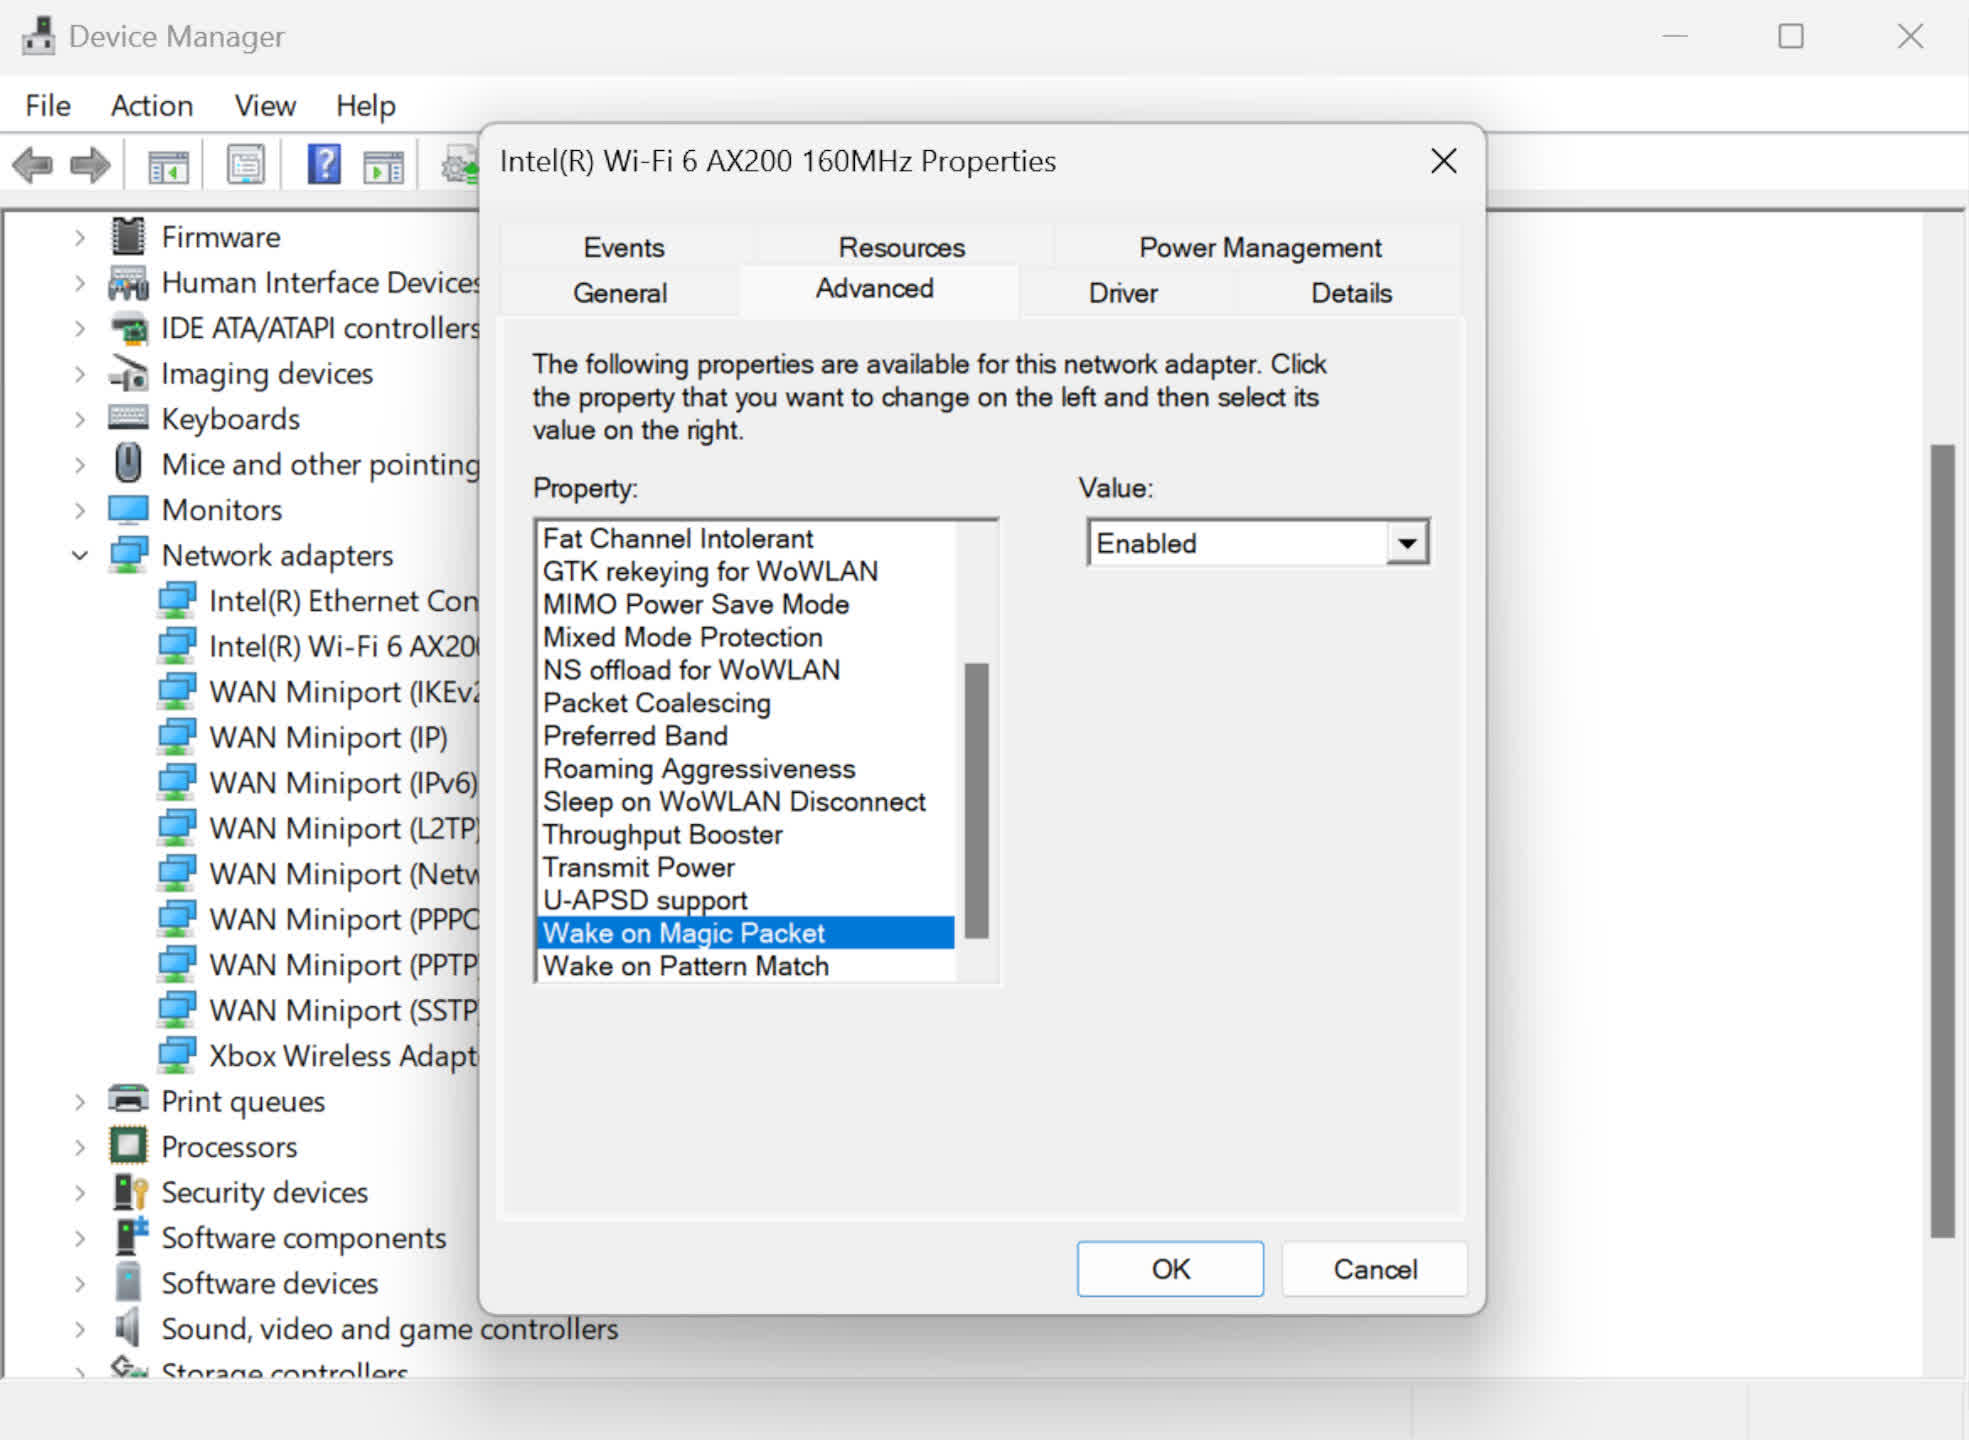
Lastly, although you shouldn’t need to do this, a quick restart of the operating system after you’ve closed all of the Device Manager windows will help to make sure that everything is working properly.
Step 3: Using apps to wake your PC
Although the PC you want to switch on using Wake-on-LAN needs to be physically connected to the network via Ethernet, the device being used to do the remote switching doesn’t — so you can use a phone that’s hooked up to the same network via Wi-Fi to do this, for example.
But let’s take a look at some Windows-based software, first. Don’t forget that the controlling software needs to be installed on the device you’re using to wake up other machines — for example, put it on a laptop, so you can use that to wake a primary PC.
Network Scanner is a good app for handling WoL actions. It’s not the most modern-looking piece of software nor absolutely novice-friendly, but it’s rich in features. It offers a free trial, with no time limits, although it will only detect a maximum of 10 devices on a network, without a license.
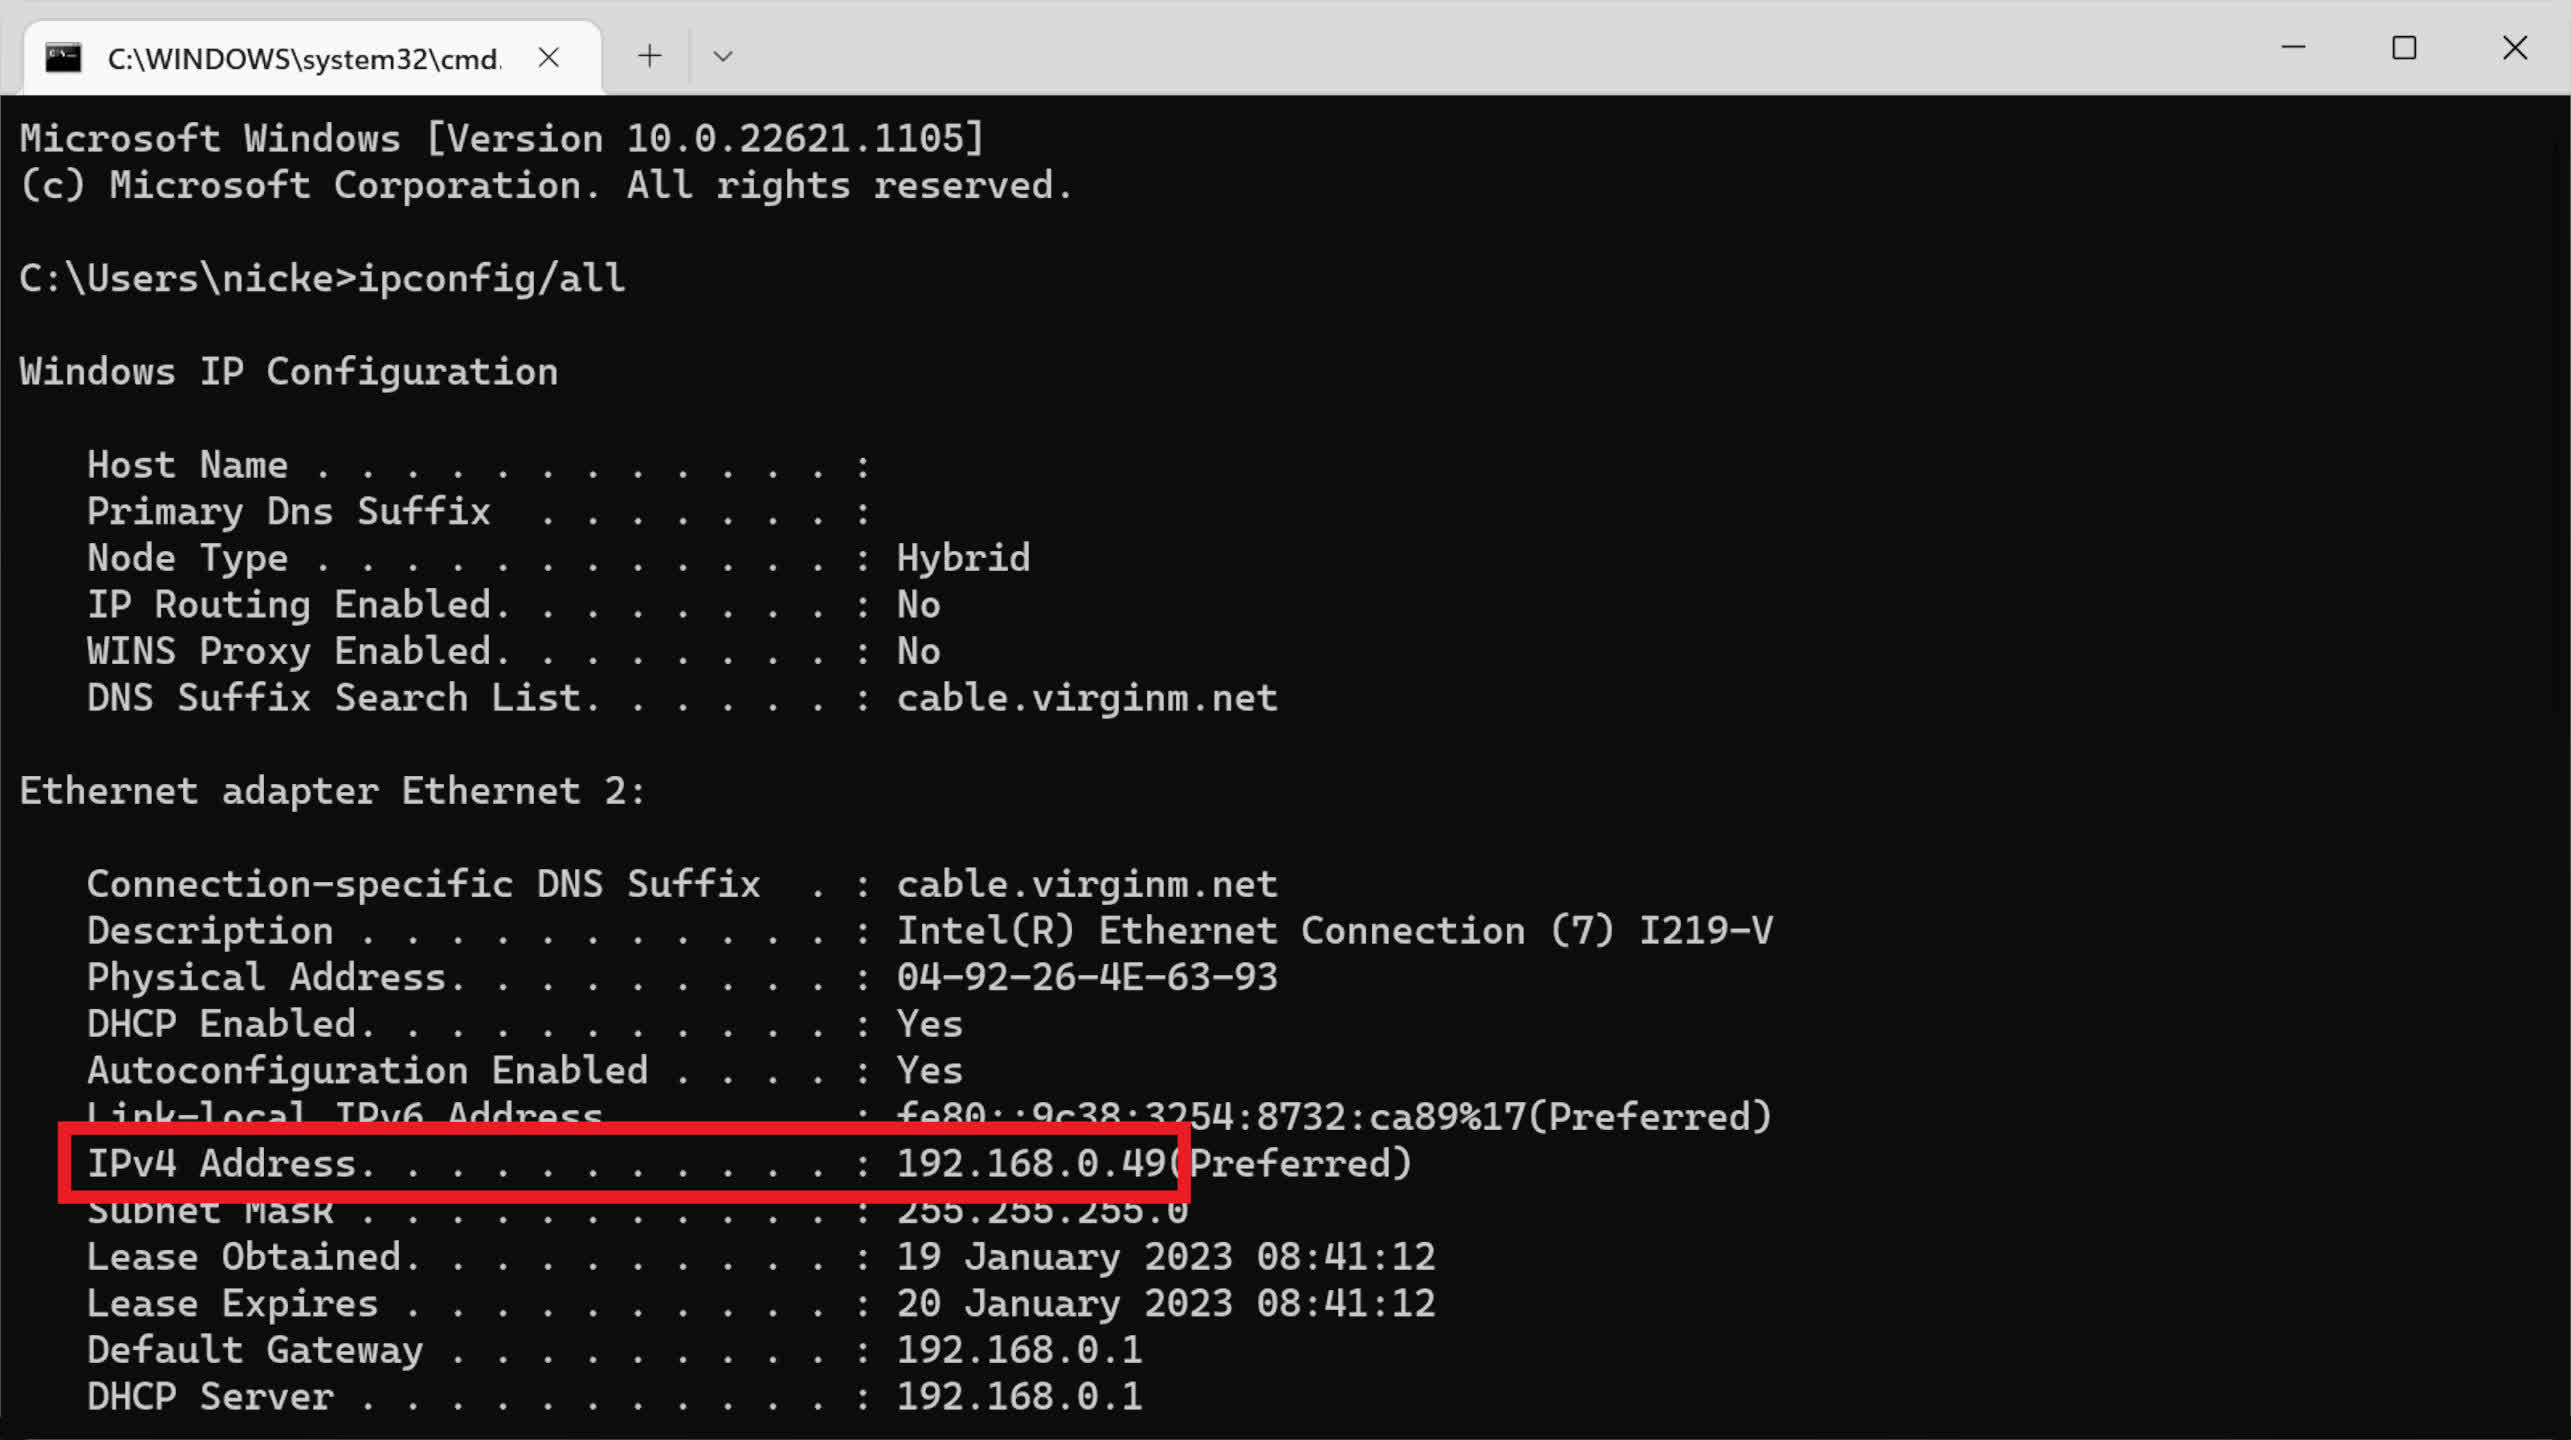
Apps like this one need to be given some information, specifically a range of private IP addresses to scan across. If you’re not sure what base IP address your network uses, press Windows key + R together, and then type in cmd. This will bring up the command prompt window — type in ipconfig/all to see all of the necessary details about the network your PC is on.
Alternatively, pressing Shift + Ctrl + Esc brings up Task Manager and in the Performance tab, the IP address of the machine you’re currently using can be viewed in the Ethernet section.
If your IP address starts with 172.16. as an example, then set the IPv4 scanning range from 172.16.0.0 to 172.16.0.255, to make sure it picks up everything that could be connected to the router.
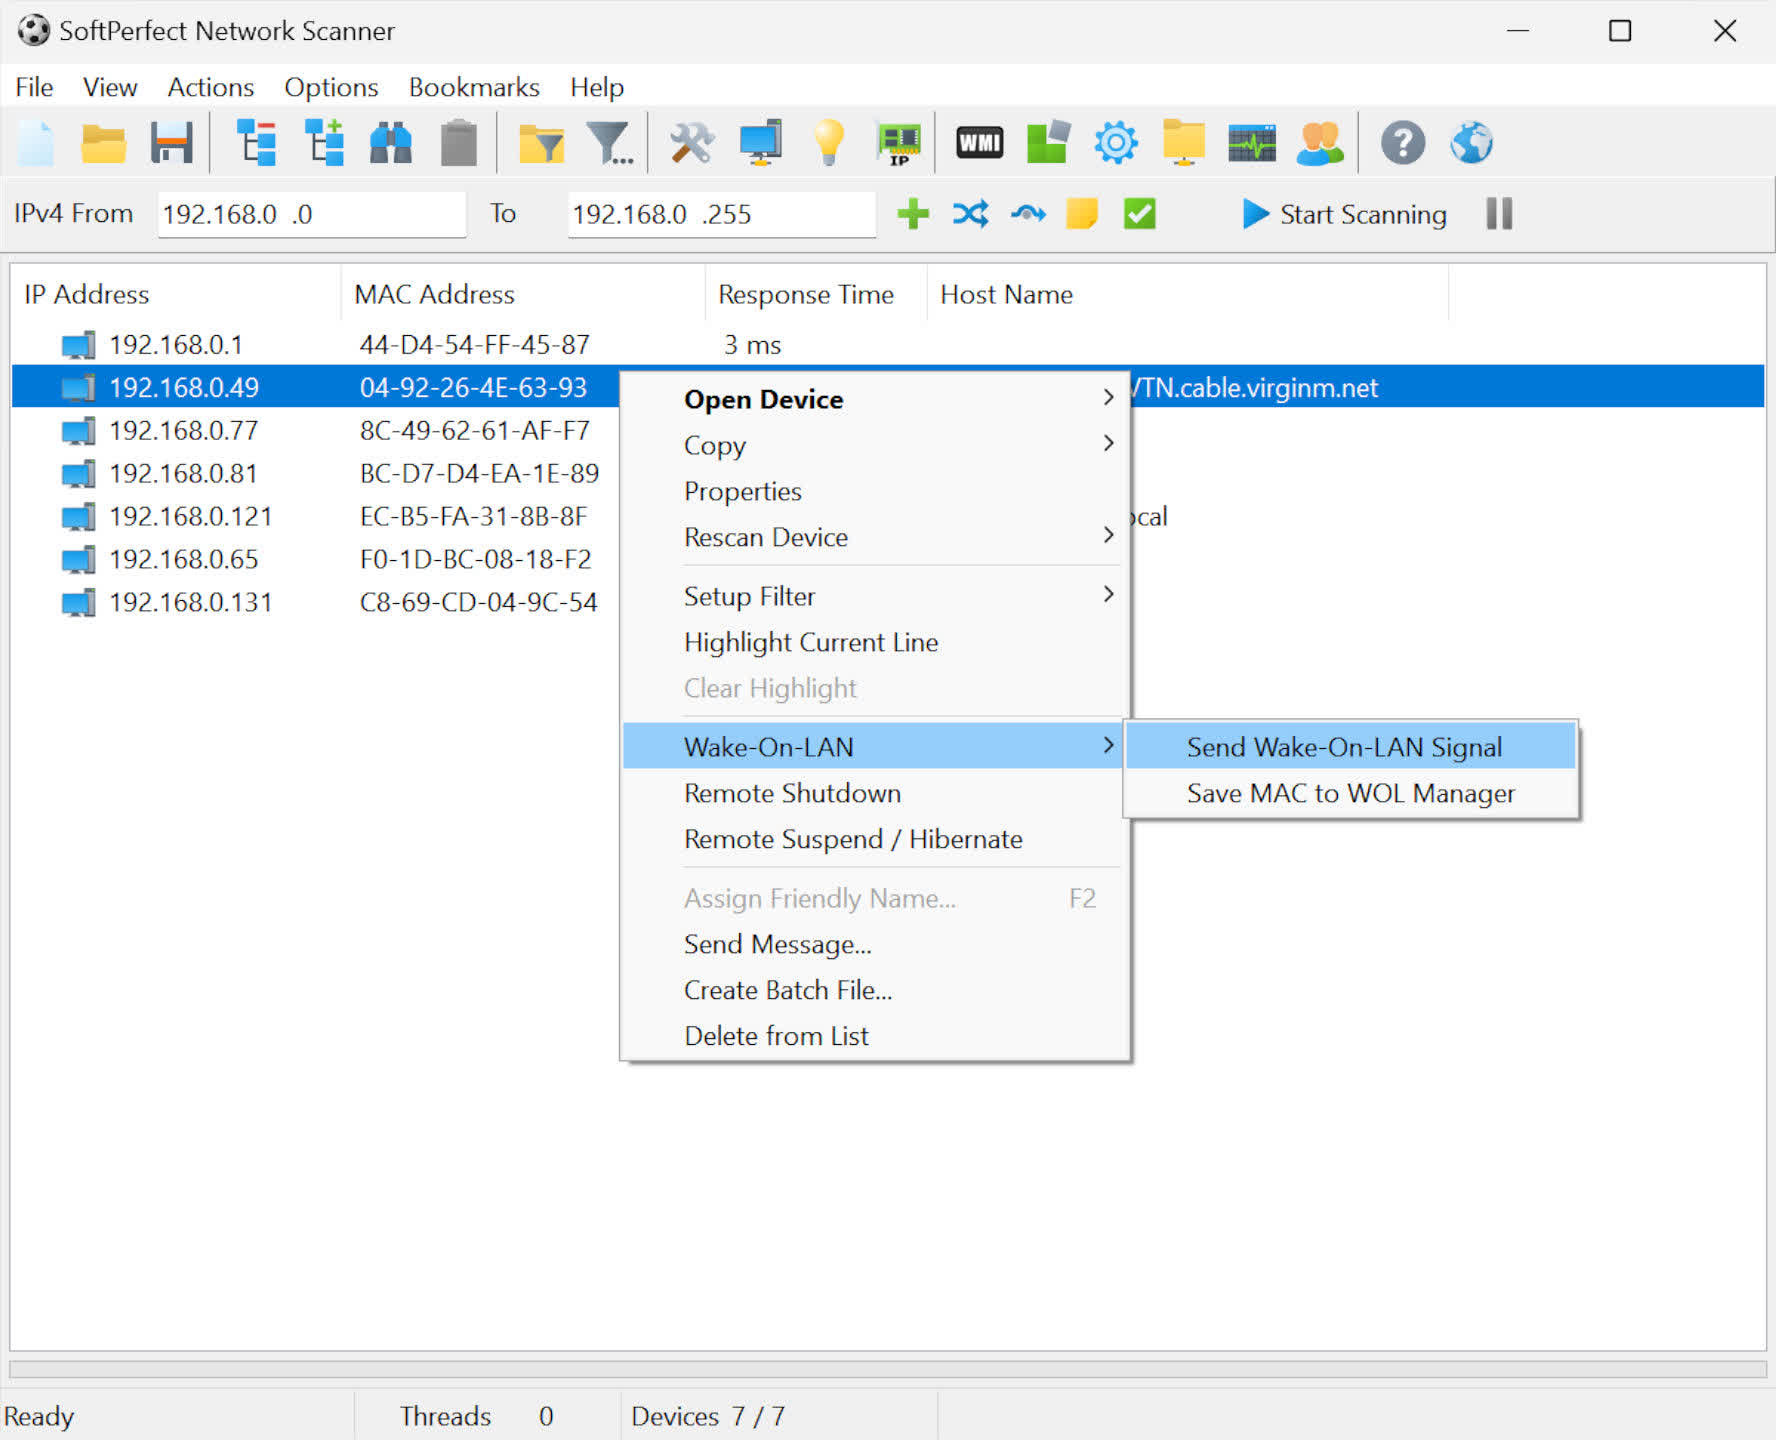
Once you’ve seen the device you want to wake up, select it by clicking on it, then right-click and go to the Wake on LAN section. Here, you’ll see the option to send the WoL signal to fire up the PC.
In the same section are options to remotely shut down or hibernate the freshly risen PC, too, so you don’t have to go back to the machine just to switch it off.
If you’re going to use a phone app to perform the WoL task, then there are plenty of free ones available for Android and iOS. However, they tend to be rather sparse in terms of features and functionality.

For example, Wake Me Up for iOS won’t scan a network and can only handle one device; you also need to provide the IP and MAC addresses for the computer you want to wake.
The MAC address can be seen in the ipconfig screenshot further up in this article (under Physical Address) — that computer will always have that address, but if your network’s router is dynamically allocated IP addresses to devices, you would need to use another app to scan the network to find it or log into the router and check the detail there.
That would be a major hassle, except that you can easily resolve it using your router’s settings.
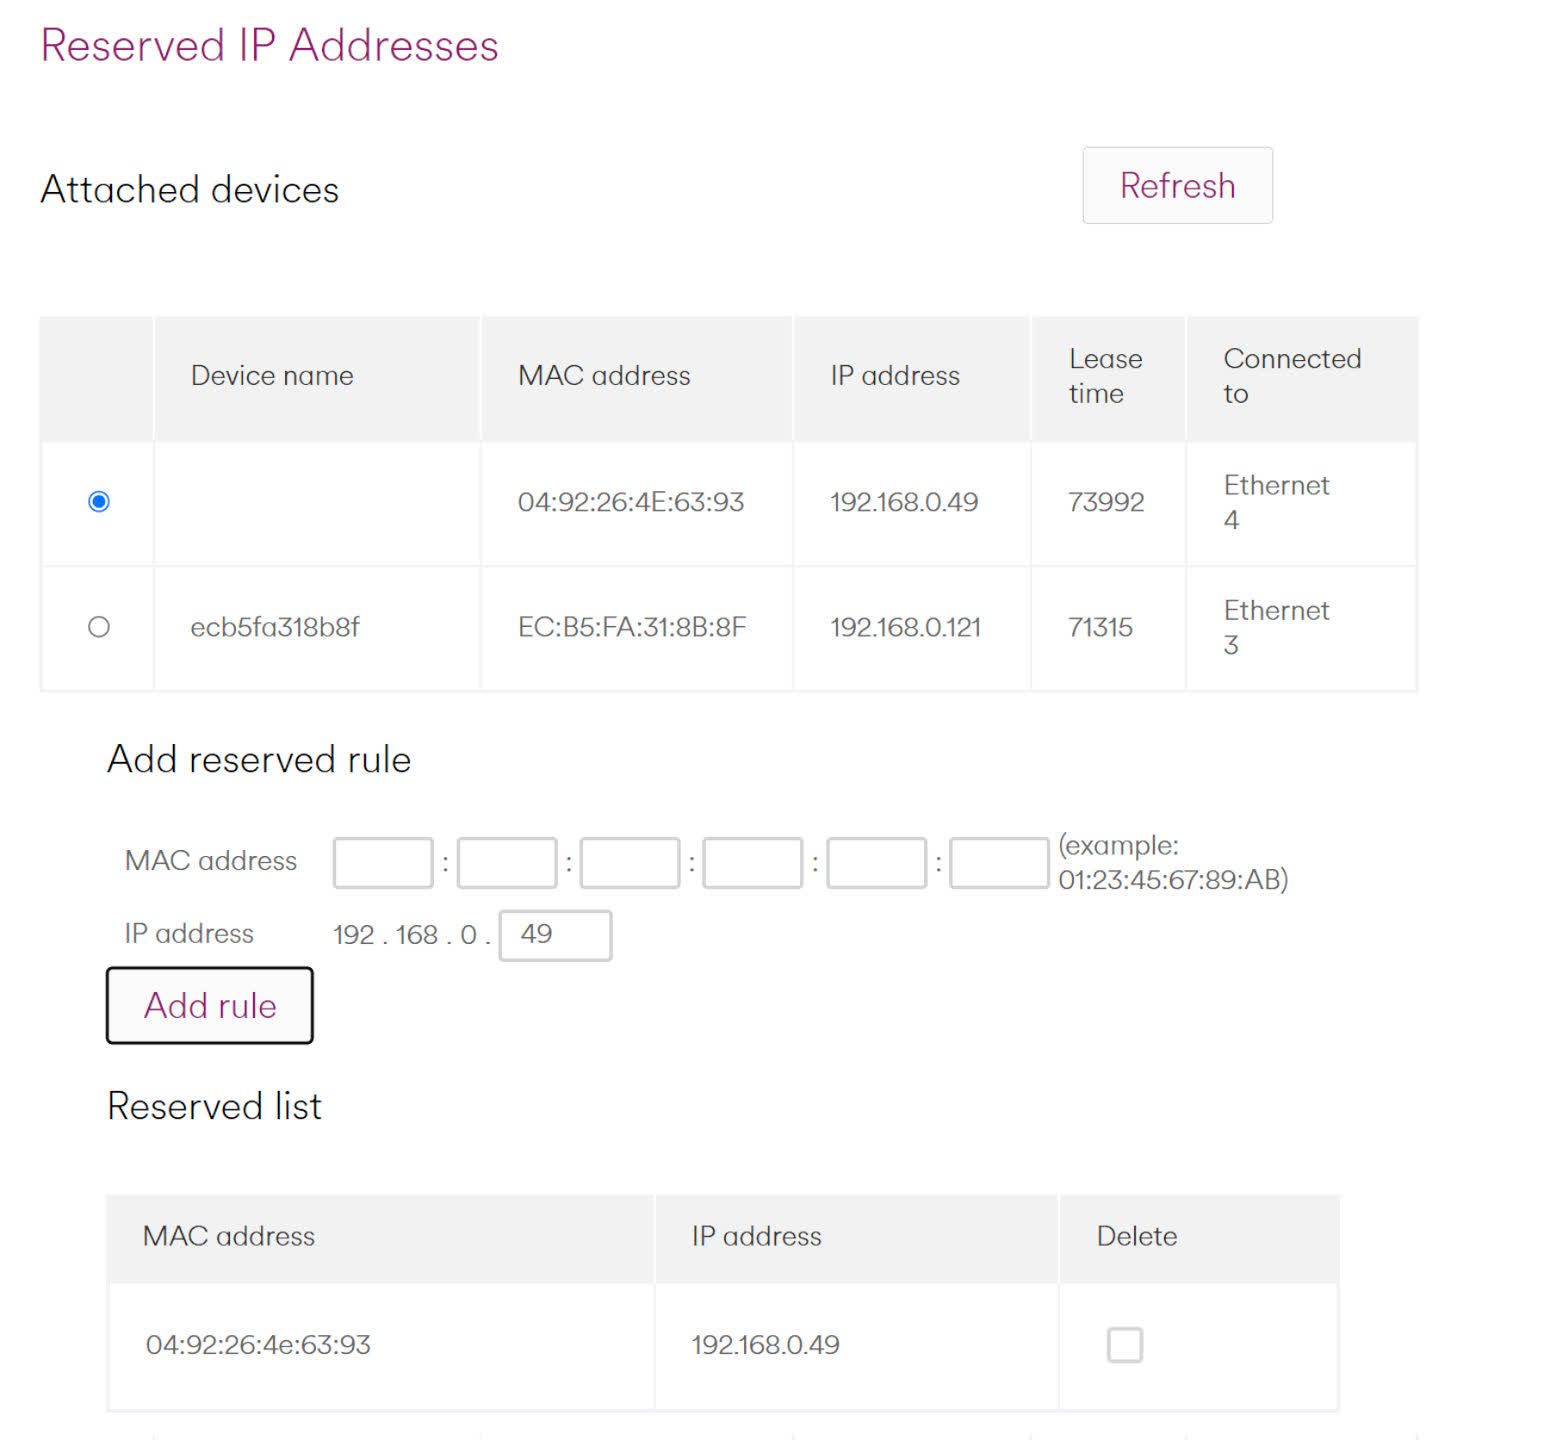
If you dive into the router’s admin panel, you should be able to set a static IP for that any device that normally connects to it. The ability to permanently lock an IP address to a specific MAC address is usually found under the DHCP settings.
Above, you can see that the router is reserving the indicated IP, so that the computer will always have that address on the network. This means that if the phone app can’t scan a network, you will only need to enter the IP and MAC addresses once.
Another useful app for handling WoL is TeamViewer, which offers a different set of functions to Network Scanner, and is available for Windows, macOS, Linux, Android, and iOS.

Not only can you remotely wake up another computer, but you can also use it to control the other PC and transfer files between machines. TeamViewer’s biggest advantage, though, is that you can also wake and access your PCs from a different network entirely (fully remote).
Going further with Wake-on-WAN
Wake-On-LAN is great if all of the devices you want to switch are on the same network. However, if you wanted to wake your PC while sitting in a cafe, for example, then you need to take a different approach and it’s one that can be rather tricky to get working.
On face value, Wake-on-WAN works in the same was as WoL except that the signal isn’t sent to the PC’s private IP address — instead, it has to go to the router’s public IP address and then uses port forwarding to send it on to the relevant device.
The first hurdle to overcome is the fact that most internet providers often change the IP your net connection uses unless you’ve paid for a static address, or your service just tends to use the same one each time.

The best way to get around this is to use a Dynamic DNS, such as those offered by No-IP or DynDNS, although you’ll need to ensure that your router offers DDNS support, too. These services monitor the IP address issued by your Internet Service Provider, via your router, and update the DDNS accordingly. So instead of using the router’s public IP address, the Wake-on-LAN app you’re using sends the magic packet to the DDNS hostname you’ve set up instead.
The service then forwards the packet onto your router and this needs to be set up so that the incoming wake-up data from the internet is then sent on through your private network. This involves opening a port to allow it to pass on (i.e. forward) the packet.
Fortunately, most routers support port forwarding but if you’re not sure as to whether yours does, further help on this matter can be found at the website Port Forward, which has a comprehensive guide to all things port related.
Each router will have a different interface when it comes to setting up port forwarding, but the key things you’ll need to enter are the IP address for the PC you want to remotely wake, port ranges of 7 to 9, and a UDL protocol. You may need to reboot the router after you’ve set the forwarding, for it to work properly.
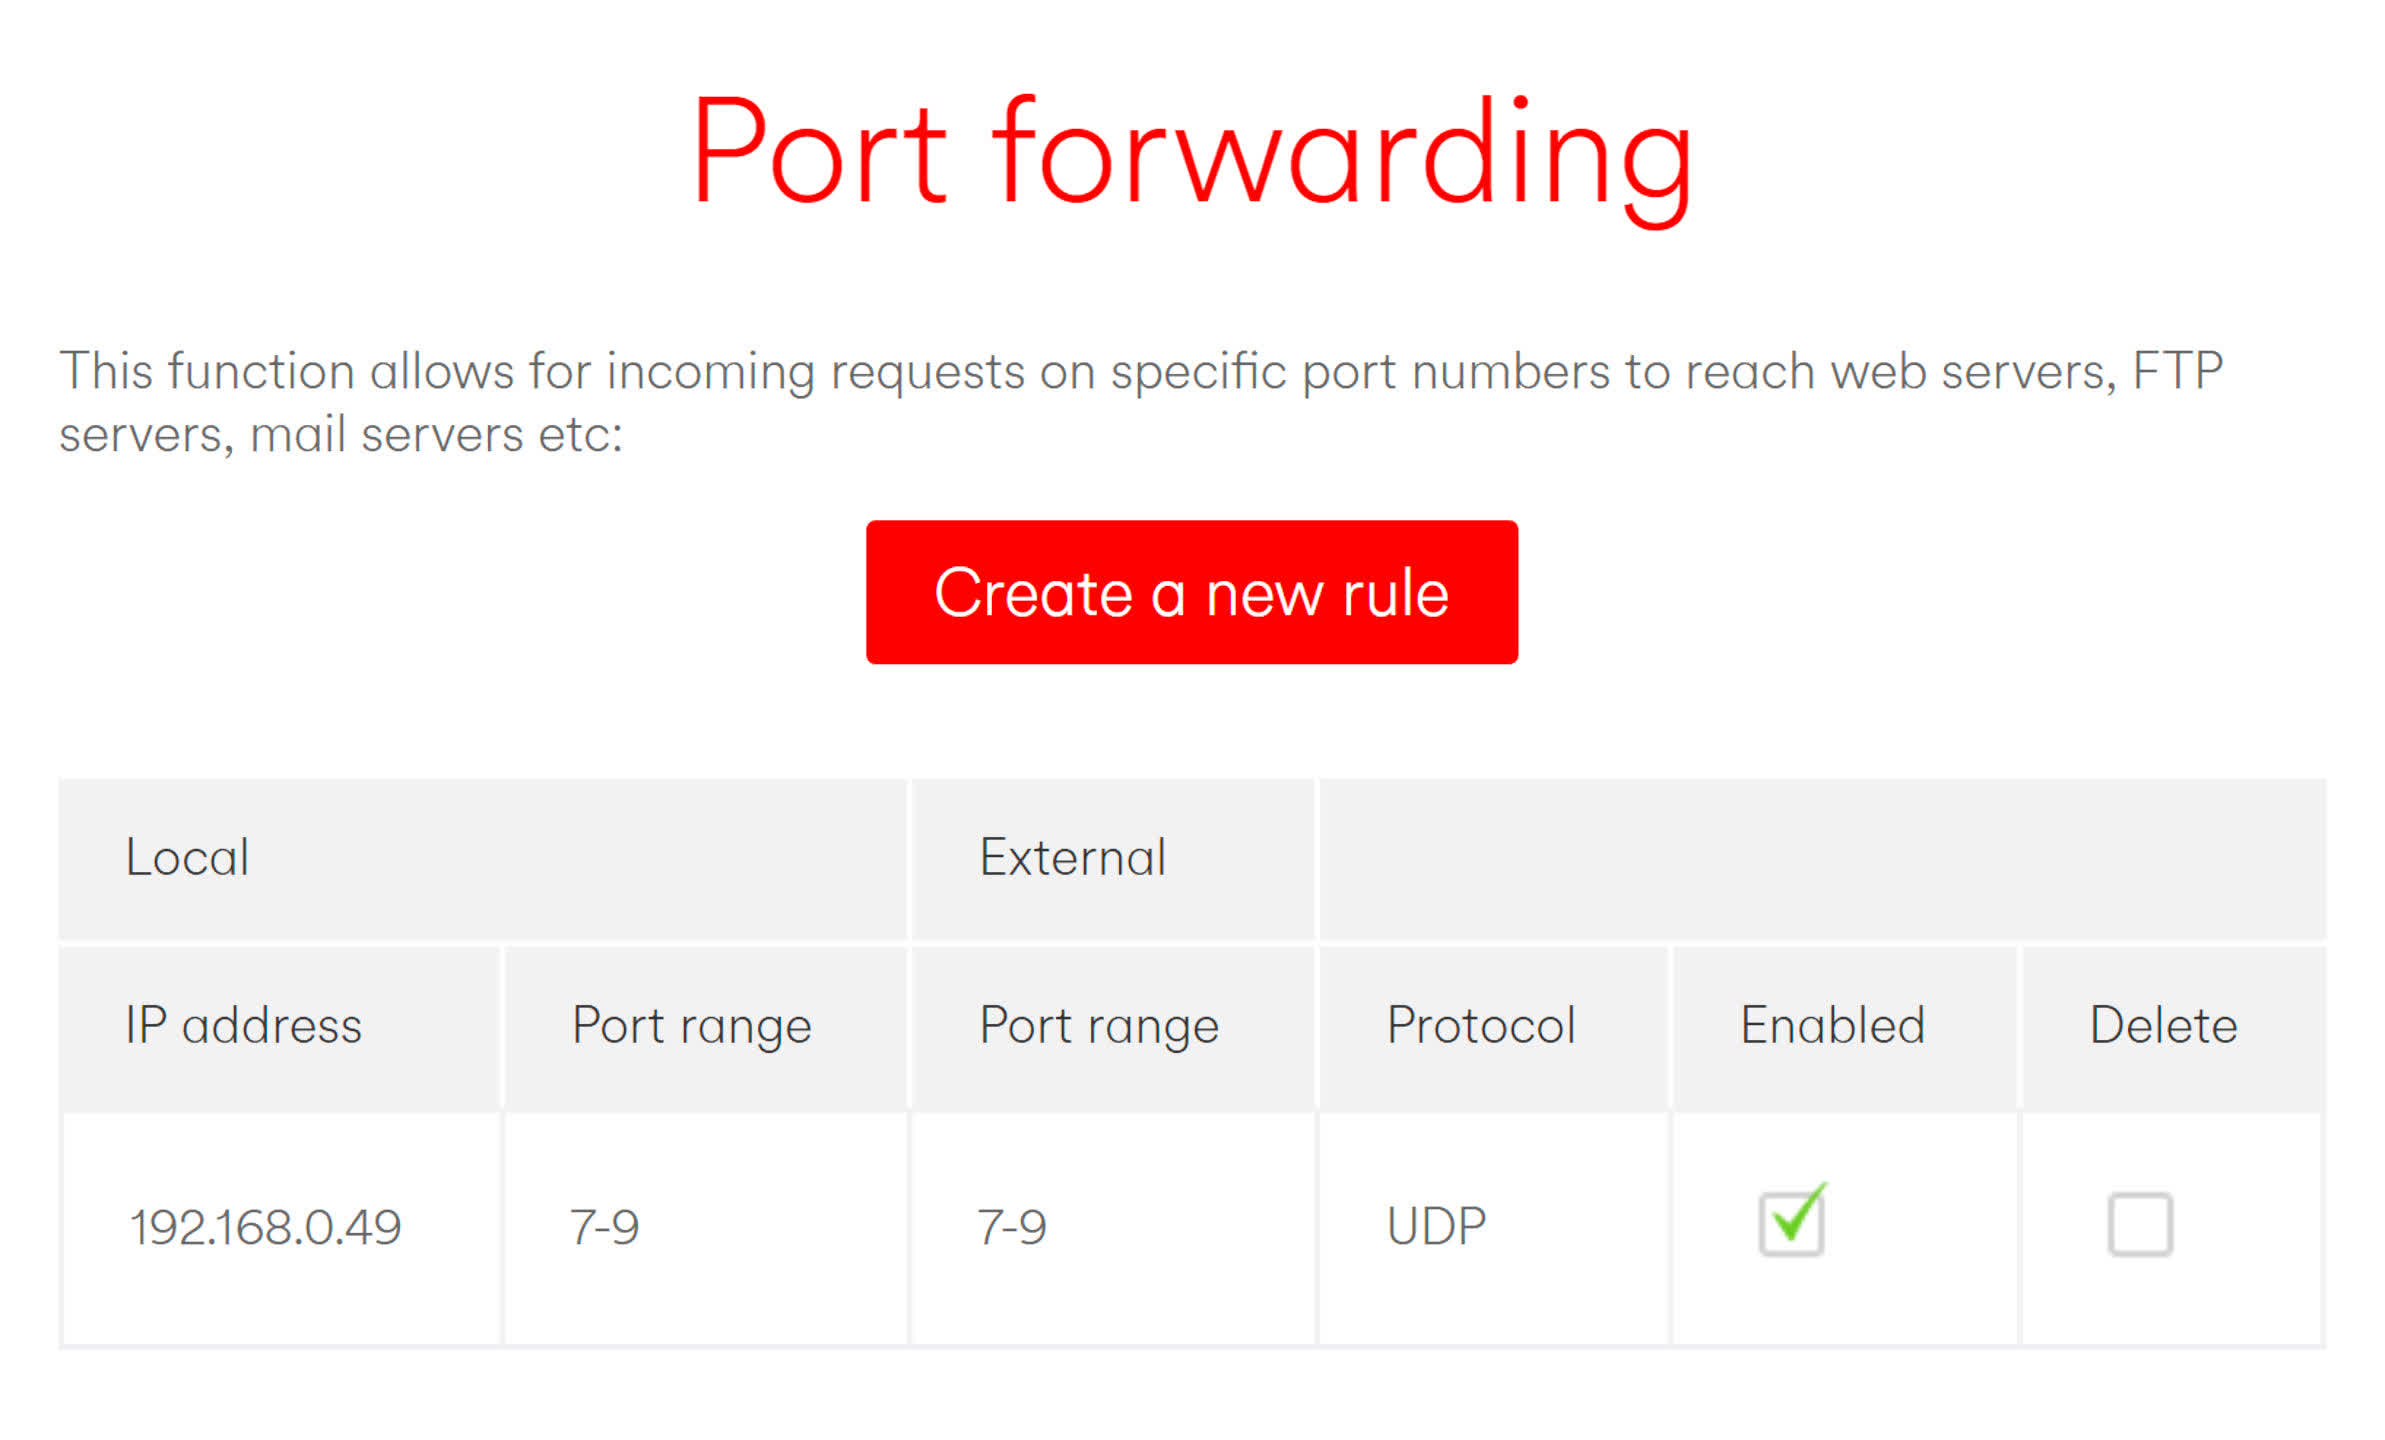
Then it’s a case of setting the Wake-on-LAN app to use the host name or public IP address from the DDNS service, instead of the private IP address for the machine to be activated. In theory, you should now be able to remotely switch on a computer on your network via the internet — should being the operative word.
Routers can be rather picky about forwarding magic packets from the internet. Some are happy enough to do it from port 7/9, others will even allow you to set the target IP to be the broadcast one (e.g. 192.168.0.255) which sends the packet to all machines connected to the network (though only the machine with the matching MAC address will wake up). However, many brands and models won’t let you do it at all.
And all of this comes with an increased risk to security — after all, you’re opening a direct connection to your PC from the internet. Ensuring all of the PCs on the network have good firewalls running, monitoring the opened port regularly is paramount, closing it when not needed, etc. is paramount.
If the above method doesn’t work, you’ll probably be better off spending the time getting to grips with the likes of TeamViewer instead. Where the use of a phone app to turn on your PC, using Wake-on-LAN takes a few moments to set up and works pretty much every time, configuring Wake-on-WAN can be an exercise in frustration.
And with that, we’ll end this guide to setting up Wake-on-LAN for Windows PCs. If you’ve got some great usage cases for WoL, please share them in the comments section below.
[ad_2]
Source link
